Appetizers

Grilled Eggplant Stacks

Grilled Eggplant Stacks

Eggplant recipes | Anne Byrn

Before my daughter’s wedding two years ago, we were looking for a first-place course for the reception dinner, a starter to the meal that could be plated and placed on the table in advance. It needed to be a course that was delicious at room temperature, and one that would actually improve in flavor as the seasonings and ingredients had time to mingle together on the plate.

Enter Eggplant Stacks!

It was this very recipe — a stack of grilled eggplant slices and tomato, seasoned with a fresh basil oil and adorned with crumbled feta. I love this recipe because it saved my day when planning that wedding meal, and also because it’s delicious any day, alone or alongside a grilled steak or piece of chicken. And when you’ve got really good tomatoes, one bite of this stack says summertime.


GRILLED EGGPLANT STACKS RECIPE:

Makes: 6 to 12 servings | Prep: 35 to 40 minutes | Grill: 7 to 8 minutes | Bake: 6 to 7 minutes

Basil Oil:
1 cup fresh basil leaves
1/2 cup olive oil
1/2 teaspoon salt

Eggplant Stacks:
2 large or 3 medium eggplants (2 to 3 pounds; 24 slices)
Salt and freshly ground black pepper
3 large tomatoes (for 12 slices total)
3/4 cup (6 ounces) crumbled feta cheese
Arugula, for serving

  1. Make the basil oil: Place the basil leaves, olive oil, and 1/2 teaspoon salt in a food processor. Process the basil until it is finely chopped. Line a sieve with paper towels and place it over a bowl. Pour the basil and oil mixture onto the paper towels and press gently on the mixture to extract the oil from the basil. About 1/3 cup of basil oil will seep into the bowl. Set aside 1 tablespoon of the basil oil for garnishing the stacks. Set aside the chopped basil leaves on the paper towels.

  2. Make the eggplant stacks: Preheat the grill to medium-high. Or, preheat an indoor stovetop grill.

  3. Trim the ends off the eggplants, then cut them into 24 slices that are a little less than 1/2-inch thick. Brush the eggplant slices on both sides with the basil oil and season with salt and pepper to taste. Grill the eggplant slices until they soften and are crisp around the edges, 7 to 8 minutes, turning once. Transfer the grilled eggplant to a platter.

  4. Preheat the oven to 400 degrees F.

  5. Cut the tomatoes into 12 slices, each about 1/3-inch thick, discarding the end slices or setting them aside for another use.

  6. For 12 short stacks, select 12 large slices of grilled eggplant and place them on a baking sheet. Spread each with 1/2 teaspoon of the reserved chopped basil. Top each with a slice of tomato and add a generous spoonful of feta cheese. Top the cheese with another eggplant slice and finish the stack with another heaping tablespoon of feta.

  7. Place the baking sheet in the oven and bake the stacks until the eggplant is warmed through and the feta has melted slightly, 6 to 7 minutes.

  8. To serve, place the eggplant stacks on a long platter, or place them on a bed of arugula on the platter. Drizzle the reserved 1 tablespoon basil oil over the stacks.


For taller stacks: Use additional eggplant, tomatoes, cheese, and basil to make them higher. They will take a little longer to heat through. And you will need to make more basil oil, too. It can be made up to 6 hours in advance and left at room temperature.

Goat Cheese, Pesto and Fig Cheesecake

Goat Cheese, Pesto and Fig Cheesecake

Goat Cheese, Pesto and Fig Cheesecake | Anne Byrn

My high school friend Laurie Bullington of Birmingham, AL, has a go-to appetizer she says always gets devoured. I shared the recipe in my cookbook, Anne Byrn Saves the Day.

It’s a little like a terrine but spreads on a cracker like cheesecake. We love it for parties of all types, all year long. Especially in the summer when we make our own pesto from the basil that grows in the garden and our own fig preserves from the big fig tree outside my kitchen window.

But then, it’s also really nice during the holidays because it’s just so festive and pretty to look at. And those sweet and spicy pecans that go on top? Make extras and bag up for last-minute gifts.


GOAT CHEESE, PESTO AND FIG CHEESECAKE RECIPE:

Serves: 8 | Prep: 15 minutes | Chill: 1 hour, or overnight

4 ounces goat cheese, at room temperature
4 ounces cream cheese, at room temperature
1/2 cup basil pesto (see My Easy Pesto)
1/2 cup fig preserves
Simple unsalted crackers for serving

  1. Spray a 5 1/2-by 3-inch (mini) loaf pan with vegetable oil spray, and line it with waxed or parchment paper and set aside.

  2. Place the goat cheese and cream cheese in a medium-size bowl and blend with an electric mixer on low speed until creamy, 30 seconds. Lightly press the cheese mixture into the loaf pan using a rubber spatula. Spoon the pesto over the cheese, spreading it out evenly. Cover the pan with plastic wrap and refrigerate until serving time, at least 1 hour.

  3. Just before serving, remove the cheesecake from the fridge. Remove the plastic wrap and invert onto a serving plate. Spoon the preserves over the top. Top with chopped Sweet and Spicy Pecans, if desired, and serve with very simple crackers or rounds of toasted French bread.


Sweet and Spicy Pecans: Place a large cast iron skillet over medium heat. Add 1 tablespoon butter, 2 tablespoons brown sugar, and 1 teaspoon hot sauce. Stir until the butter melts. Remove the pan from the heat. Stir in 1 cup pecan halves, and stir until the pecans are coated with the mixture. Reduce the heat to low, and place the skillet back over the heat. Cook and stir 1 minute, or until the pecans are lightly toasted, being careful not to burn the sugar. Remove the pan from the heat and let the pecans cool completely, 20 minutes.

My Easy Pesto: In a pinch, you can use a 3.5-ounce jar of prepared pesto found in the supermarket or better yet, make this recipe. To keep the pesto green, I use a mixture of fresh basil and arugula. Place 1 clove peeled garlic in a food processor fitted with a steel blade. Mince until fine. Add 2 cups basil leaves and 2 cups arugula leaves and process. Add 2 tablespoons pine nuts, 1/4 cup grated Parmesan cheese, salt and pepper to taste. Process briefly. With the motor running, dribble in about 1/2 cup olive oil until it thickens and comes together. Turn off the machine, scrape into a glass bowl with lid, and store.

Whole Wheat Cheese Straws

Whole Wheat Cheese Straws

Cheese Straws | Anne Byrn | The Cake Mix Doctor

Cheese straws — the long, willowy, thin and crispy cheese wafers of the South — are deliciously greasy and shatter when you bite into them. But at the same time, they are proper enough to serve your mother. Whether cut into lengths looking like a straw or sliced into round coins, they are made to be shared.

Southerners have embraced them as long as we can remember at tea-time, cocktail parties, and wedding receptions. I think of cheese straws when I think back to funerals of favorite aunts and grandmothers, as they were among the array of foodstuffs brought to our house in condolence.

And I think of them at happier times, too, at cocktail parties and holiday gatherings, at Derby parties in May, on anniversaries, at Thanksgiving pre-festivities, Christmas, and New Year's. If you want to entertain well, you only need a cocktail and a good recipe for cheese straws.

Made of flour — white or whole wheat — and butter, grated cheese, and a little cayenne pepper, my basic cheese straw recipe is simple and therein lies the beauty. You can make them quickly from what's in your kitchen. They are fast, and they are cheap. And if thinking ahead, you can bake them days ahead of the party and stash them in an airtight metal tin or freeze them in a plastic bag.

They're forgiving, unassuming, deliciously humble, and oh-so Southern.


WHOLE WHEAT CHEESE STRAWS RECIPE:

Makes: 3 dozen 4-to 6-inch long straws | Prep: 10 minutes | Chill: 1 hour | Bake: 12 to 15 minutes

2 cups (8 ounces) shredded extra-sharp cheddar cheese
6 tablespoons unsalted butter, soft
1 cup whole wheat flour
1/8 teaspoon cayenne pepper
1/4 teaspoon kosher salt
Kosher salt, for sprinkling, if desired

  1. Place the cheese, butter, flour, cayenne, and salt in the bowl of a food processor and pulse until the mixture comes together into a ball. Scoop the dough onto a sheet of plastic wrap, cover completely, then press down slightly to make a disk with the dough. Place in the fridge to chill 1 hour.

  2. When ready to bake, place a rack in the center of the oven, and preheat the oven to 350 degrees F.

  3. Remove the dough from the refrigerator, and roll it out on a floured surface to 1/4-inch thickness. Cut into 1/2-inch wide strips about 4 to 6 inches long and bake on ungreased pans in a until golden brown, about 12 to 15 minutes. With a metal spatula, remove immediately to wire racks to cool. If desired, sprinkle with salt, and store in a tightly covered metal tin to stay crisp.


How to make cheese coins: Form the dough into a log, wrap in parchment and chill. Slice into 1/4-inch rounds and bake until golden. If you like, place a pecan half in the center of each round before baking.

Southern Fried Green Tomatoes

Southern Fried Green Tomatoes

fried_green_tomatoes_078.JPG

When I see green tomatoes, I am reminded about the fried green tomatoes cooked at the late Betty Talmadge's farm called Lovejoy about 25 miles south of Atlanta. In the 1980s, Betty would stage these lavish southern-themed dinner parties for friends and clients. And thanks to her cook Cile, she offered fried green tomatoes by the bucketful.

I once walked back into the insanely busy kitchen in the middle of one of these parties, and there was Cile, pulling sliced green tomatoes from their bath of salted ice water. She would dredge them in a mixture of seasoned white cornmeal and flour, and then fry until crispy. Her trick was to place the fried tomatoes along the inside walls of colanders to let them drain off grease but stay delicious and crispy. My friend Nathalie Dupree told me the colander has long been used to drain fried chicken and green tomatoes. It was "an excellent rural solution for all fried foods."

Nathalie remembers fried green tomatoes served with white gravy alongside chicken-fried steak. She thinks of them as a food of fall, and she says they are best fried and eaten "right out of the pan." Dupree likes a combination of cornmeal and flour on a pie plate for dredging, just like Cile used, but instead of oil she likes to sauté in butter. "I like the crisp edginess" that butter gives to the frying.


SOUTHERN FRIED GREEN TOMATOES RECIPE:

Serves: 4 (12 to 18 slices) | Prep: 15 to 20 minutes | Soak: 2 hours or overnight | Cook: 4 minutes per batch

3 to 4 medium-size green tomatoes, peeled
4 cups (1 quart) cold water
2 teaspoons kosher salt
2 cups ice cubes
1/3 cup all-purpose flour
1/3 cup white cornmeal
1/2 teaspoon salt
Freshly ground black pepper
Peanut or vegetable oil for frying

  1. Slice the tomatoes into about 4 slices each. Set aside. Place the cold water in a large mixing bowl and stir in salt. Add ice cubes. Place the tomato slices in the salted ice water, and place the uncovered bowl in the refrigerator overnight or for at least 2 hours.

  2. When ready to fry, remove the bowl from the refrigerator. Pour off the water, and drain the tomato slices. Pat them dry with paper towels. Place the flour, cornmeal, salt and pepper in a shallow dish or pie plate, and stir to combine. Dredge the tomatoes in the mixture, coating well on all sides. Place on a baking sheet in the fridge or freezer while you heat the oil.

  3. Place enough oil in a large cast-iron skillet to measure 1 inch up the side of the pan. Heat over medium-high heat until 350 degrees, or until a pinch of the cornmeal mixture sizzles. Remove the tomato slices from the fridge, and carefully drop three or four slices at a time into the hot oil. Fry until golden brown on each side, about 2 minutes per side. Remove the slices to a colander or wire rack to drain. Once drained, keep warm on a baking sheet in a 200-degree oven.

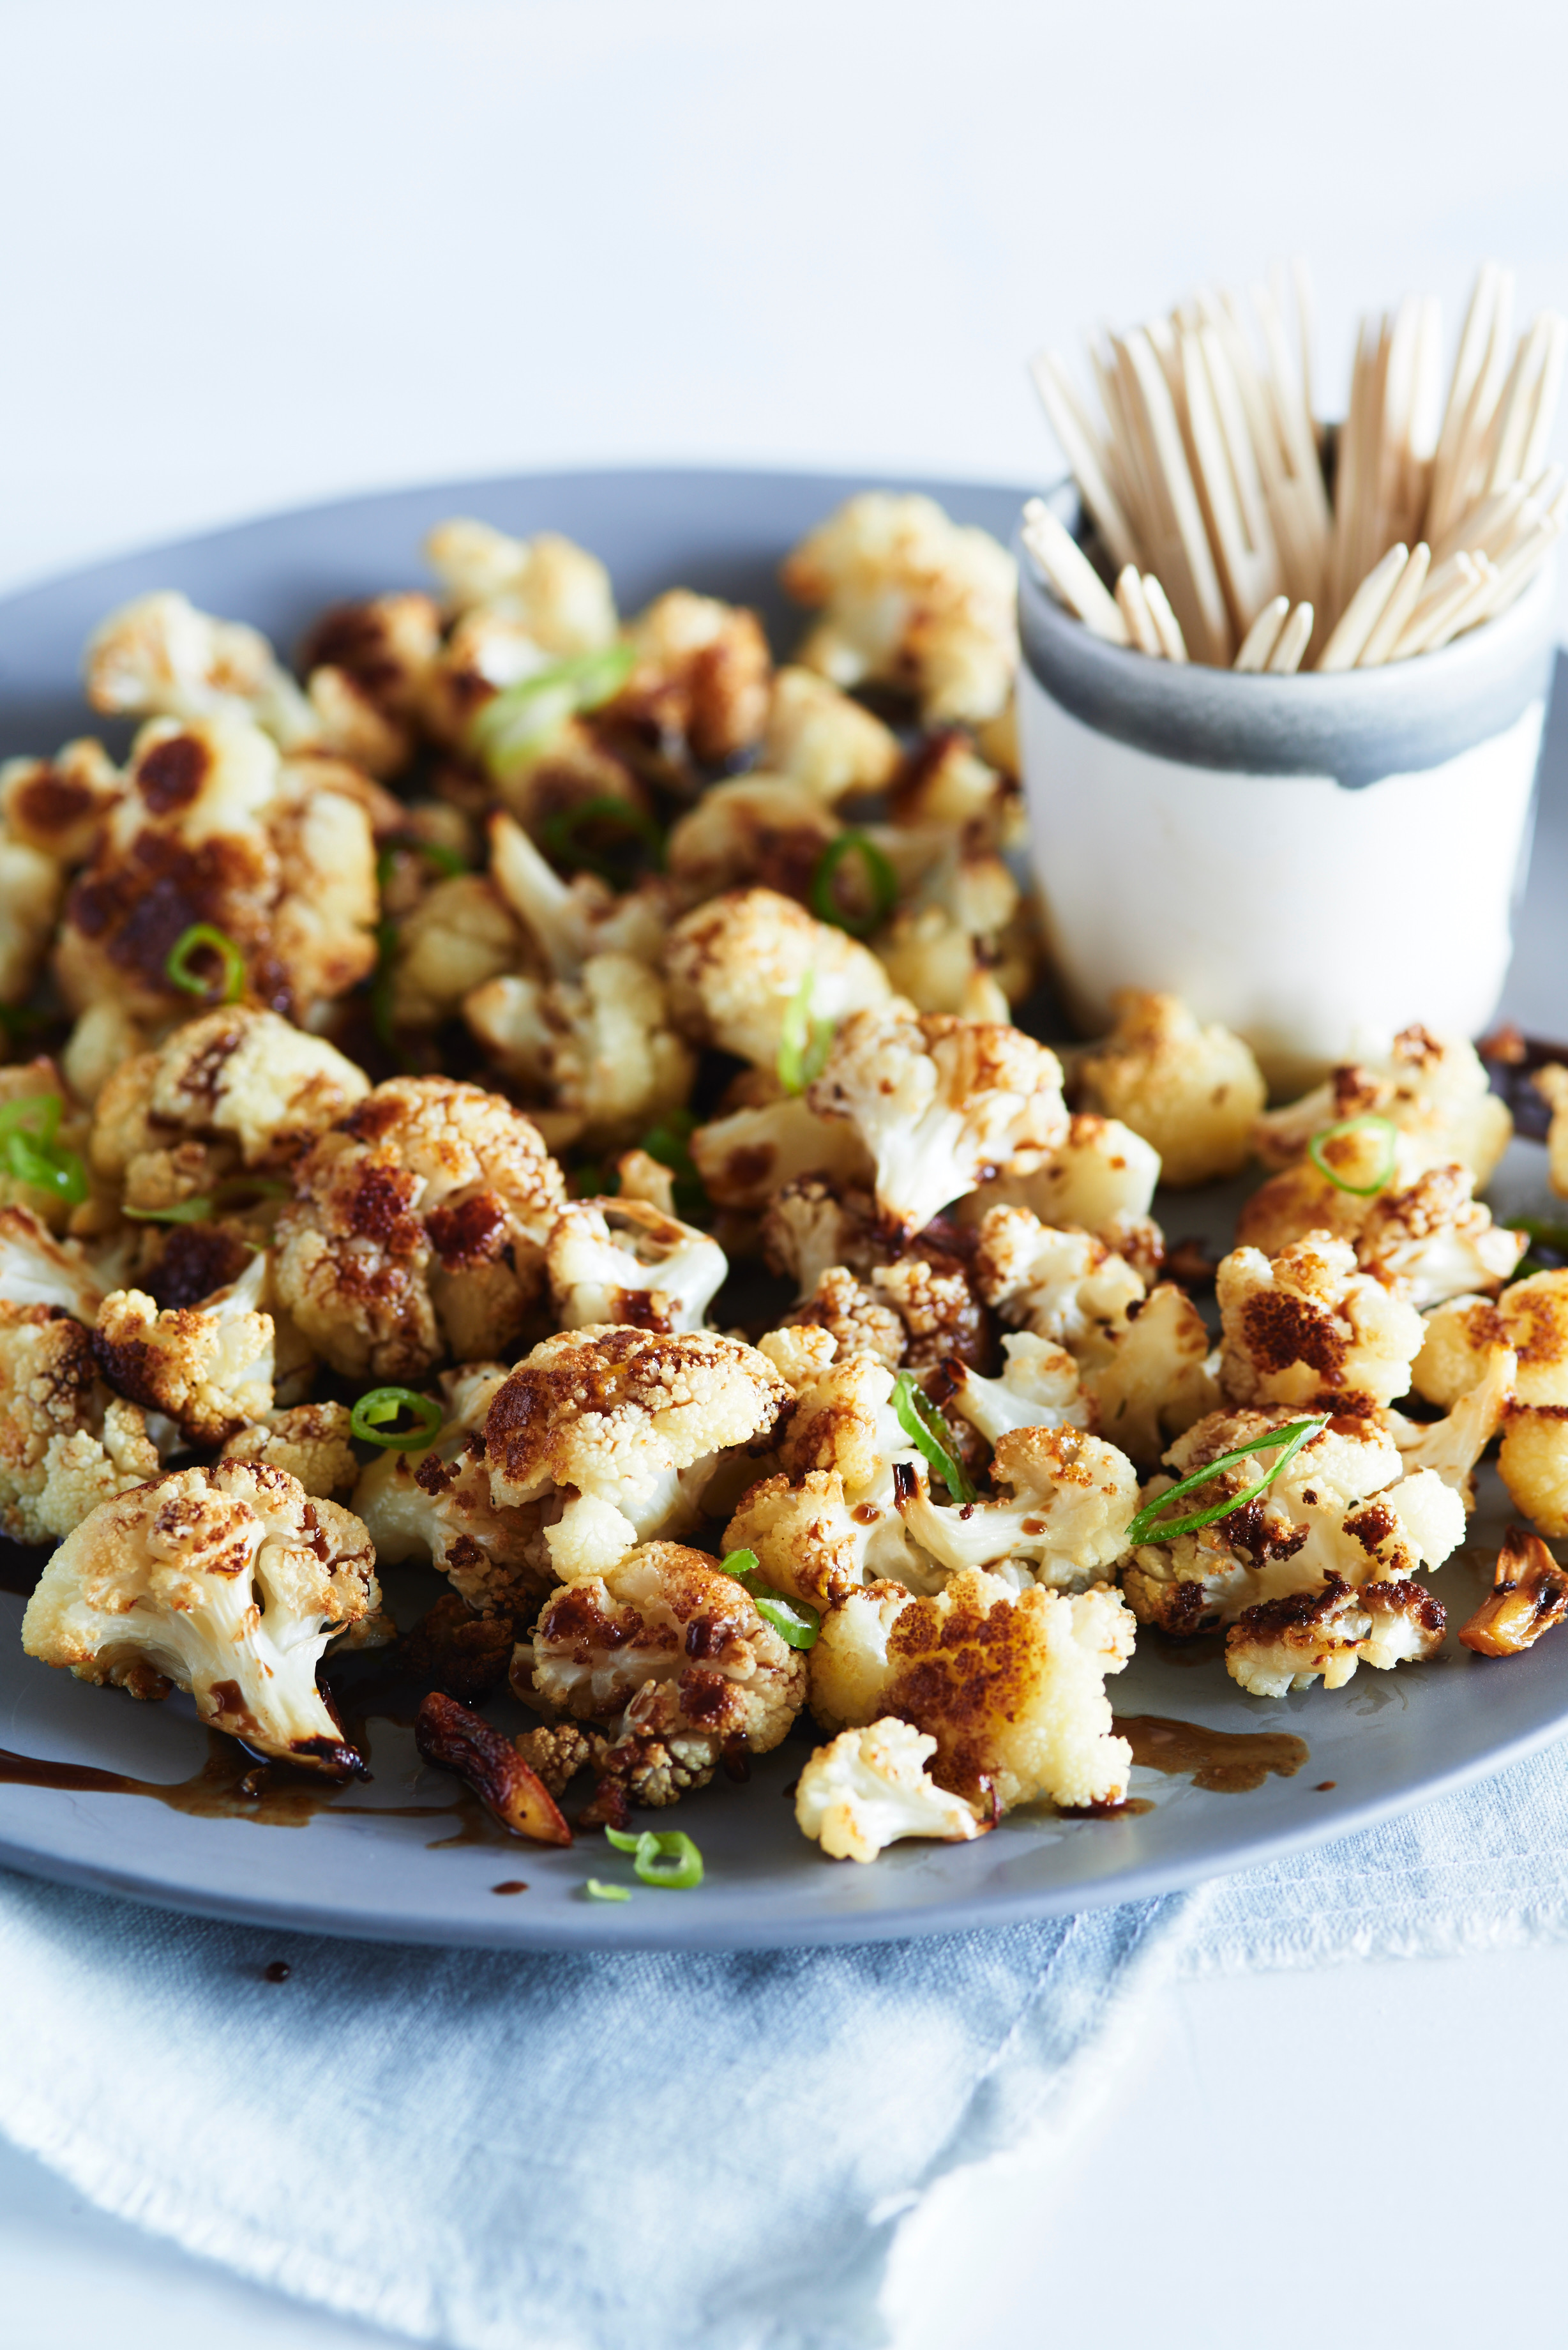
Sorghum Glazed Cauliflower Bites

Sorghum Glazed Cauliflower Bites

sl_cauliflower_bited_011.JPG

Roasting brings out the natural sweetness in cauliflower and broccoli, and there is no better vehicle for roasting veggies than the cast-iron skillet. This recipe comes from my book Skillet Love, and I use sorghum, that earthy and wonderful sweetener known in the South and Midwest, in this recipe. The skillet lets the cauliflower cook to browned sweet doneness, and when you pour over the sorghum vinaigrette, the retained heat of the pan sizzles that sauce, reduces it, and makes it even more syrupy and wonderful. Feel free to use pomegranate molasses or honey instead of the sorghum. And serve warm from the skillet with toothpicks.


SORGHUM GLAZED CAULIFLOWER BITES RECIPE:

Makes: 6 to 8 servings | Prep: 10 to 15 minutes | Cook: 15 to 20 minutes

Cauliflower:
1 small head cauliflower, white or purple, or 1 head broccoli
4 cloves garlic
3 tablespoons olive oil
1/4 teaspoon salt

Glaze:
3 tablespoons sorghum or pomegranate molasses
2 tablespoons balsamic vinegar
1 teaspoon Dijon mustard
1/2 teaspoon grated fresh lemon zest

Garnish:
2 tablespoons chopped cilantro or green onions

  1. Place a rack in the center of the oven, and preheat the oven to 425 degrees.

  2. Cut the florets from the head of cauliflower or broccoli, and separate them into small pieces. You will have about 4 to 5 cups. If you have more than this, do not use more than 5 cups because this will crowd the 12-inch skillet and they will steam instead of roast. Peel and slice the garlic into 1/4-inch thick pieces. Toss the cauliflower (or broccoli) and garlic with the olive oil, and season with salt. Pile into a 12-inch skillet and place in the oven.

  3. Roast the cauliflower until is is lightly browned, 15 to 20 minutes.

  4. Meanwhile, prepare the glaze. Place the sorghum, vinegar, mustard, and lemon zest in a small bowl and whisk to combine.

  5. Remove the skillet from the oven and pour the glaze over the top. Toss to distribute the glaze and let the glaze bubble up. Garnish with chopped fresh cilantro or green onions and serve right from the skillet with toothpicks. Or, pour the contents of the skillet into a serving bowl, garnish, and serve.

Caramelized Onion and Gruyere Pizza

Caramelized Onion and Gruyere Pizza

Caramelized Onion and Gruyere Pizza | Skillet Love | Anne Byrn

One of the easiest, most hands-off ways to caramelize onions is in a slow cooker. The onions cook down to a sweet caramel color and you don't have to watch over them in fear of burning. This recipe came from my friend, Atlanta artist Nancy Everett. Make the onions ahead of time and store in your fridge for last-minute pizza cravings. You just add Gruyere and Parmesan cheeses, kalamata olives, and springs of fresh thyme. Cut into little squares for appetizers or bigger squares for dinner!


CARAMELIZED ONION AND GRUYERE PIZZA RECIPE:

Makes: 1 pizza (12 inches) | Prep: 5 minutes | Cook: 10 to 15 minutes | Rest: 5 minutes

Slow-Cooked Caramelized Onions:
3 pounds Vidalia onions, peeled and thinly sliced
8 tablespoons (1 stick) lightly salted butter

For the pizza:
Cornmeal, for prepping the pan
1 pound fresh pizza dough
1 cup Slow-Cooked Caramelized Onions
1 cup shredded Gruyere or ½ cup grated
Parmesan cheese
¼ cup pitted kalamata olives
2 sprigs fresh thyme, roughly chopped or stripped of its leaves
1 tablespoon olive oil
Kosher salt and pepper, to taste

  1. For the onions, place the sliced onions in the bottom of a 4-quart slow cooker. Cut the butter into tablespoons and distribute on top.

  2. Cover and cook on low power for 12 hours, or until the onions are cooked down and a dark rich brown color.

  3. When ready to make pizza, place a rack in the center of the oven, and preheat the oven to 425 degrees F. Sprinkle a dusting of cornmeal over a 12-inch pizza pan and set aside.

  4. Mist your hands with olive oil and press the dough out onto the prepared pan so that it stretches into a 12-inch circle or covers the bottom of the pan. Spoon the onions over the top of the dough, scattering them with your fingers so they are distributed evenly. Sprinkle the cheese over the onions. Scatter the olives and thyme over the top of the cheese. Drizzle the olive oil around the edges of the crust, and sprinkle the crust with salt and pepper. Place the pan in the oven.

  5. Bake until the cheese bubbles and the outside edge of the crust is golden brown, 10 to 15 minutes. Remove the pan and let the pizza rest 5 minutes, then slice and serve.


Note: The onions can be made 4 to 5 days ahead and stored, covered, in the fridge.